Prep time: 15 minutes
Cook time: 0 minutes
Total time: 15 minutes
Servings: 4
The allure of a delightful dessert often lies in its ability to satisfy a sweet tooth while still being incredibly easy to make. One such indulgence is the **Strawberry Dessert Cups**. This no-bake creation combines the fresh sweetness of strawberries with a rich, creamy filling, all beautifully presented in individual cups. It’s ideal for busy parents looking for a quick treat to please their family or for anyone wanting to impress guests without spending hours in the kitchen. In this recipe, you’ll find tips, variations, and everything you need to recreate this simple yet elegant dessert.
What Is Strawberry Recipes Easy: Strawberry Dessert Cups (No Bake)?
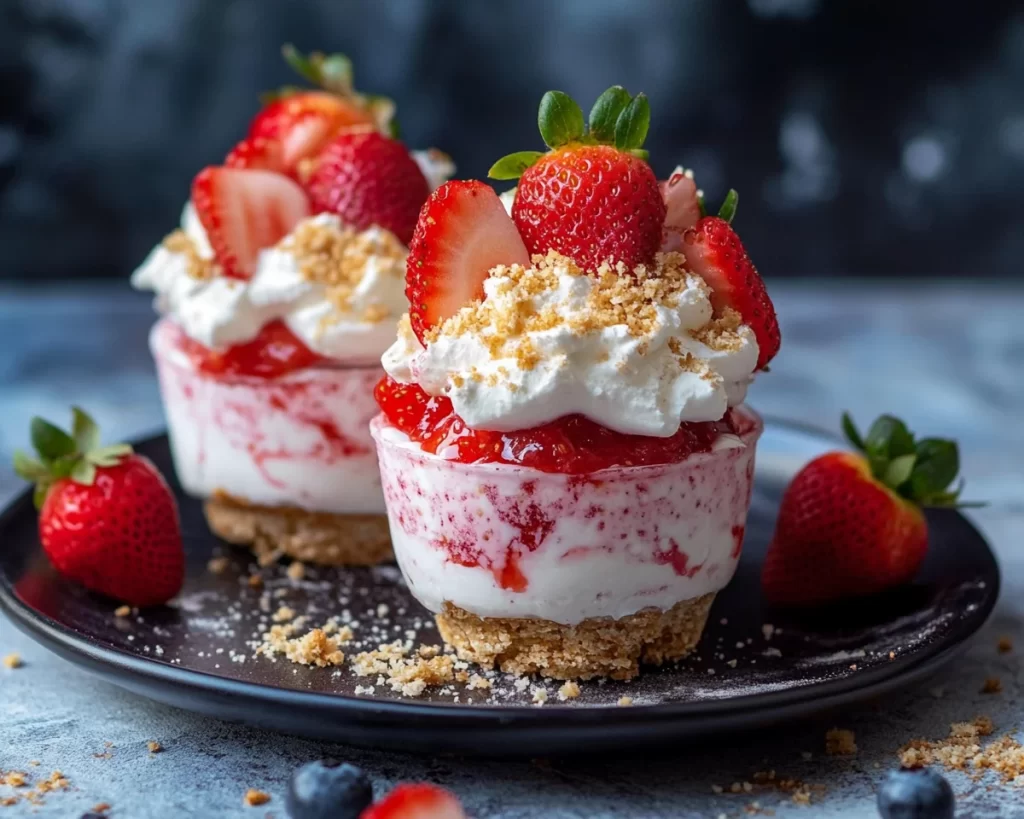
The **Strawberry Dessert Cups** are a no-bake treat that has become increasingly popular due to their combination of flavors and textures. Originating from various dessert traditions, this dish allows for creativity and adaptation; you can change up the ingredients according to preferences or seasonal availability. The creamy filling, usually made from cheese, whipped topping, or pudding, contrasts beautifully with the **fresh strawberries** that add a burst of flavor.
The texture of the dessert is another noteworthy feature. The fluffy filling melts in your mouth while the **strawberries** provide a juicy crunch that elevates the overall experience. You’ll find the charming visual appeal of the dessert as enticing as its flavor. Perfect for gatherings, this recipe speaks to simplicity without compromising on elegance, making it a go-to solution for your dessert cravings.
Why You’ll Love This
There are countless reasons you’ll cherish this **Strawberry Dessert Cups** recipe. First, the taste is absolutely divine, blending the sweetness of strawberries with the creaminess of the filling. The ease of preparation is another major plus—this recipe only requires mixing a few ingredients and assembling them in cups, making it perfect for even novice home cooks. You can whip it up in just 15 minutes, allowing you to spend more time enjoying the dessert rather than laboring over intricate steps.
Additionally, it’s an economical choice as strawberries can often be found for a reasonable price, especially during their peak season. This dessert provides a fantastic nutritional profile too; the strawberries offer vitamin C and antioxidants, while you can customize the filling to include healthier options like Greek yogurt. Addressing common misconceptions, this dessert doesn’t need to be labor-intensive or time-consuming to be impressive. You can enjoy a **delicious**, visual feast without breaking the bank or your home cooking spirit.
Ingredients You’ll Need
- 2 cups of fresh strawberries, hulled and sliced
- 1 cup of whipped topping (can substitute with Greek yogurt)
- 8 ounces of cream cheese, softened
- 1/4 cup of powdered sugar
- 1 teaspoon of vanilla extract
- 1 cup of crushed graham crackers (for the base)
- 1/4 cup of unsalted butter, melted
Each of these ingredients plays a vital role in achieving the perfect balance of flavor and texture. The **fresh strawberries** provide natural sweetness and vibrant color, while the **whipped topping** adds an airy smoothness. For those seeking a lighter option, Greek yogurt serves as a wonderful substitute for the whipped topping, lending a slight tang that complements the sweetness.
Cream cheese gives the filling its rich and creamy flavor, while **powdered sugar** brings the necessary sweetness without the grittiness of granulated sugar. The **crushed graham crackers** form a delicious, crunchy base that acts like the crust of a cheesecake, combining perfectly with the melted **butter** for added flavor.
How to Make
- Begin by preparing the graham cracker crust. In a mixing bowl, combine the crushed graham crackers with the melted **butter**. Mix until all the crumbs are coated but not overly soggy.
- Next, press the graham cracker mixture into the bottom of individual serving cups or a larger decorative dish, firmly compacting it for a sturdy base. Setting this aside allows it to firm up slightly as you prepare the filling.
- In another bowl, combine the softened **cream cheese**, **powdered sugar**, and **vanilla extract**. Use a hand mixer to beat the mixture until it’s smooth and creamy, ensuring there are no lumps. This step is crucial for achieving a velvety texture in your dessert.
- Gently fold in the whipped topping or Greek yogurt into the cream cheese mixture. Be careful not to overmix; the goal is to maintain the light, airy quality of the whipped topping.
- Once the filling mixture is well combined, spoon it generously over the graham cracker crust in each of the serving cups.
- Top each dessert with the freshly sliced **strawberries**, allowing their natural sweetness to shine. You can arrange the slices decoratively for an aesthetically pleasing finish.
- Finally, refrigerate the dessert cups for at least 30 minutes before serving. This allows the flavors to meld beautifully, enhancing the overall experience and giving the filling a firmer texture.
Variations & Substitutions
Chocolate Strawberry Variation: If you’re a chocolate lover, consider adding a layer of chocolate pudding between the crust and the cream cheese filling. The rich cocoa flavor pairs beautifully with the strawberries and can easily elevate the entire dessert. This variation is perfect for those looking for an indulgent treat or a way to surprise guests with an unexpected twist.
Gluten-Free Variation: To cater to gluten-sensitive friends or family, replace the standard graham crackers with gluten-free options. Many brands offer gluten-free graham cracker alternatives, allowing you to create a similar flavor and texture without compromising on safety for gluten-free eaters.
Vegan Variation: For a vegan-friendly take, substitute the cream cheese with a cashew cream or a store-bought dairy-free cream cheese product. Use coconut whipped cream in place of regular whipped topping, and adjust the powdered sugar to taste. This variation retains the creamy texture while ensuring it’s entirely plant-based and suitable for vegans.
Berry Medley Variation: If you want to add complexity to your dessert, why not incorporate a mix of berries? A combination of raspberries, blueberries, and strawberries can create a delightful medley that’s bursting with flavor and adds visual interest. This option is fantastic during the summer months when berries are at their peak.
Common Mistakes to Avoid
Many first-time dessert makers fall into common pitfalls, often leading to disappointing results. One critical mistake is overlooking the importance of properly softening your **cream cheese**. If it’s not sufficiently softened, you may end up with lumps in the filling that detract from the smooth texture you’re aiming for. Ensure your cream cheese is at room temperature for optimal mixing.
Another common error is overmixing the cream cheese and whipped topping mixture, which can complicate achieving the light and fluffy consistency that makes this dessert attractive. It’s best to fold gently until just combined for the best texture. Also, don’t skip the chilling time! Skipping refrigeration can result in a runny filling that won’t hold its shape.
Storage, Freezing & Reheating Tips
If you’ve made a larger batch or have leftovers, storing your **Strawberry Dessert Cups** correctly is essential for maintaining their freshness. You can keep them covered in the refrigerator for up to three days. The key is to ensure they are tightly sealed with plastic wrap or placed in an airtight container to prevent the strawberries from becoming soggy.
For longer storage, you can freeze these dessert cups. Just remember to omit the strawberries when freezing, as they do not freeze well. Instead, you can prepare the filling and crust and freeze them separately. When you’re ready to serve, thaw in the refrigerator overnight and layer with fresh strawberries right before enjoying.
Always adhere to food safety best practices; if you notice any off-smells or changes in texture after storage, it’s best to err on the side of caution and not consume the dessert.
Frequently Asked Questions
Can I use frozen strawberries instead of fresh? Yes, you can use frozen strawberries, although keep in mind that they might be more watery when thawed. Drain excess juices to prevent your dessert from becoming soggy.
How can I make this recipe healthier? To create a healthier version, use low-fat cream cheese, reduce the amount of sugar, or substitute with honey or maple syrup. Additionally, using Greek yogurt instead of whipped topping boosts protein content and reduces sugar.
What can I use instead of graham crackers? If you’re looking for alternatives, consider using crushed pretzels for a salty-sweet balance, or you could use digestive biscuits. For a gluten-free variant, any gluten-free cookie can be used as a base.
How far in advance can I prepare this dessert? You can make the filling and crust a day in advance. However, for the freshest taste, assemble everything no more than 6 hours before serving. This helps to ensure the strawberries are at their peak and maintain a firm texture.
Can I adjust the sweetness to my liking? Absolutely! The recipe allows you to adjust the amount of sugar according to your taste. Start with the recommended amount, then increase until you reach your desired sweetness without overwhelming the fresh strawberry flavor.
Conclusion:
The **Strawberry Dessert Cups** embody what a great dessert should be—easy to make, visually stunning, and full of sweet, luscious flavors. The combination of fresh strawberries with a creamy filling while resting on a crunchy base makes for the perfect treat any time of the year. Don’t be afraid to experiment with variations or make this dessert your own. Whether you’re having a family dinner, a picnic, or just want to enjoy a sweet moment with yourself, this recipe is sure to deliver. Give it a try, and I’m confident it will soon become one of your go-to desserts. Enjoy the sweet journey!