There’s something utterly magical about the way a whole chicken roasts in the oven, don’t you think? I mean, the aroma wafting through the house, the sizzle of the skin, the sheer satisfaction of carving through perfectly cooked meat—all of it simply feels like home. I first stumbled upon the concept of spatchcock chicken a few years ago during a gathering with friends where cooking was our main source of entertainment (don’t get me started on the wine intake!). Someone mentioned that spatchcocking was the ultimate game-changer for roasting chicken, and my ears perked up like I was in a 1950s diner where the jukebox just played my favorite tune.
At first, I was intimidated, and if I’m being totally honest, downright terrified at the idea of cutting up a whole chicken. You see, I’m no butcher. But as fate would have it, the next day I decided to give it a go, and lo and behold, that chicken turned out to be one of the best I had ever made. Crispy skin, juicy meat, and the kind of dinner that immediately brings everyone to the table—as though the chicken itself possesses magnetic properties! That moment sparked a love affair with my cast iron skillet, and let me tell you, we’ve been inseparable ever since.
Now, I want to share my favorite, eccentric, slightly chaotic, and utterly delightful spatchcock chicken recipe with you. It’s a dish that has become a staple in my house, perfect for impressing guests or simply treating myself to something delicious after a long day. Honestly, making spatchcock chicken is a celebration—one that welcomes laughter and gathers loved ones around. So ready your skillet, and let’s dive into this flavorful journey together!
What Goes Into Spatchcock Chicken?
So, before you begin, let’s break down the ingredients. You’ll find that spatchcocking is beautifully straightforward. Here’s what you’ll need:
Whole Chicken: About 4-5 pounds is perfect. I usually go for organic when I can—there’s just something about supporting local farms and ensuring a better quality of meat. Plus, you’ll thank me later when you taste the difference!
Olive Oil: Use a generous amount (around ¼ cup). I swear by my Italian Aunt Rosa’s olive oil, which she insists is only good if you can see the sun glisten in it. “You should be able to swim in it,” she says. You can definitely use whatever is in your pantry, but aim for good quality if you can.
Lemon: A couple of lemons, juiced and zested, brightens everything up. Seriously, this is an absolute must. I sometimes call it liquid sunshine. You know what I mean?
Fresh Herbs: I love using a blend of rosemary, thyme, and parsley. You can also throw in some oregano if you’re feeling wild! The combination brings that classic roasted chicken flavor right to life. Growing these herbs on my balcony has turned me into a tiny plant mom, so no shame if you’re growing your own!
Garlic: I usually use about 4-6 cloves, smashed up nicely. Garlic, in my book, is basically a form of magic dust—you can never have enough of it!
Salt and Pepper: Honestly, my advice is to keep it simple. Kosher salt works like a charm for seasoning, and fresh cracked black pepper adds that lovely bite.
Vegetables (optional): I often toss in some chopped potatoes, carrots, or onions because they soak up the chicken juices and turn into little nuggets of joy. Plus, you get a one-pan meal and who doesn’t love that?
Now, these ingredients are just a starting point for you to work with. The beauty of cooking is that there are no strict laws—so if you have something lying around in your fridge that screams to be used, go ahead and include it!
Is Spatchcock Chicken Actually Good for You?
Now, before you take a sharp turn at the thought of indulging in a whole roasted chicken, let me just clear the air. Yes, spatchcock chicken is one of those deliciously indulgent meals, but it can also be a healthier option when prepared with a conscious touch. The whole chicken is packed with protein, essential vitamins, and minerals.
Here’s the thing, though: it can be a bit rich if you slather it in butter (though I’ll admit—sometimes a generous smear of herb butter adds an unreal flavor!). It’s all about balance. Using olive oil instead of butter keeps it lighter, and that summery lemon juice adds zing, making all the flavors shine without being too heavy.
As for those vegetables? When roasted, they’re lovingly cradled in savory chicken goodness, and let’s not forget—you’re getting vitamins from them too. So yeah, while it’s not a salad, it’s definitely a meal that can be savored without the guilt.
Here’s What You’ll Need
– Whole Chicken (4-5 lbs)
– ¼ cup Extra Virgin Olive Oil
– 2 Lemons (juiced and zested)
– A small bunch of Fresh Rosemary
– A small bunch of Fresh Thyme
– A handful of Fresh Parsley
– 4-6 cloves of Garlic (smashed)
– Salt (to taste)
– Freshly cracked Black Pepper (to taste)
– Optional: 4 medium Potatoes (washed and cut), 4 Carrots (peeled and chopped), and 1 Medium Onion (quartered)
How to Make Spatchcock Chicken Step-by-Step
Alright, let’s roll up our sleeves! This is where the magic happens, and believe me, you’ll feel like a culinary superstar.
1. **Preheat your oven** to 450°F (232°C). This step is crucial for getting a crispy skin; trust me, you don’t want a flop-sweaty chicken hanging out in a warm oven.
2. **Prepare your chicken**. Place that beautiful bird on a cutting board, breast-side down. If you’re cringing at the thought of handling raw chicken, just wash your hands afterwards, okay? This is where the spatchcocking comes in! Using a sharp pair of kitchen shears, start cutting along one side of the backbone. You’ll hear a little crunching; that’s normal! Just channel your inner badass chef.
3. **Cut along the other side** of the backbone to remove it. Don’t worry if you’re messing up slightly; the chicken is still going to taste fantastic. Once it’s out, flip the chicken over so it’s breast-side up and press down on the breastbone to flatten it. This is a great stress-reliever if you’re having one of those days!
4. **Season your chicken**. In a bowl, mix together the olive oil, lemon juice and zest, garlic, chopped herbs, salt, and pepper. Rub that mixture all over the chicken, getting into every nook and cranny—it’s like giving your chicken a spa treatment!
5. **Prepare your veggies** (if using). Toss the chopped potatoes, carrots, and onion in a bit of olive oil, salt, and pepper. Make sure they’ve got good coverage. These bad boys can bask in the delicious chicken juices while they roast.
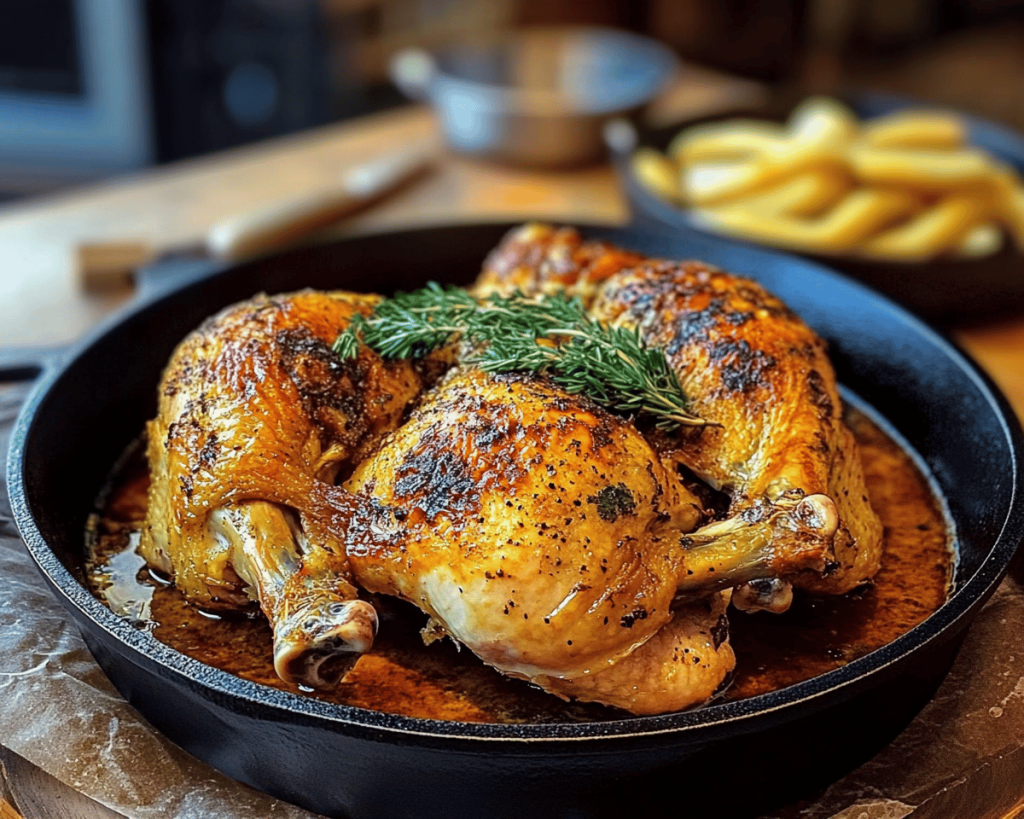
6. **Place everything in your cast iron skillet**. Lay the chicken in the center, and scatter the vegetables around it. It’ll look beautiful and inviting, like a warm hug on a plate.
7. **Pop that skillet in the oven**. Roast for 45-55 minutes, or until the internal temperature reads 165°F (74°C) at the thickest part of the chicken. Keep an eye out, because the skin should be gloriously golden and slightly crispy. If you’re feeling risky (and I usually do), you can broil it for the last couple of minutes to get that skin even crispier. Just don’t walk away, or you might end up with toast instead of chicken!
8. **Rest your chicken**. After you take it out, you’ll want to let it breathe for about 10-15 minutes before slicing into it. I know, this is the hardest part! But the resting allows the juices to redistribute, ensuring juicy bites and less drippage on your plate.
9. **Serve and enjoy**! Carve the chicken and dig into those roasted veggies. Honestly, it’s a symphony of flavors. Gather your loved ones—or if you’re like me, enjoy it on grandma’s old plate while curled up on the couch binging your favorite show. No judgment here!
Little Extras I’ve Learned Along the Way
Now, as with any cherished recipe, I’ve picked up a few tips and tricks along the way—some of which are absolute game-changers!
– **Herb Variations**: Feel free to switch up the herbs based on what you have available. Fresh basil? Sure! Parsley is always my go-to, but don’t shy away from experimenting.
– **Spicy Twist**: If you want to kick it up a notch, add some crushed red pepper flakes to the seasoning mix. It adds a surprising zesty bite that will have your friends asking for the recipe!
– **Cooking Ahead**: One of my favorite ways to enjoy this recipe is to prep the chicken the night before and let it marinate in the fridge. The flavors meld beautifully overnight, and all you have to do the next day is pop it in the oven.
– **Use Leftovers Wisely**: If you happen to have leftovers (which is rare, but I do cross my fingers), shred the chicken and throw it on salads, in wraps, or mix it with some mayo for a quick chicken salad sandwich.
– **Cast Iron Skillet Care**: If you are lucky enough to own a cast iron skillet, you already know it’s a treasure. Just remember that you should never put it in the dishwasher—treat it like a delicate flower by hand-washing it and seasoning it occasionally with some oil, and it will last you a lifetime.
And there you have it, my wild and wonderful journey through the world of spatchcock chicken in a cast-iron skillet. It fills my heart with warmth every time I make it, and I hope it brings you just as much joy and laughter. Whether it’s for a Sunday dinner, a cozy evening, or an entertaining gathering, I invite you to try it out.
This one means a lot to me. Honestly, it holds the stories of friends gathered around the table, excited chatter, and laughter that turn into lasting memories. So, if you decide to give it a whirl, let me know how it goes! I’d love to hear your twist or any little quirks you throw in. Happy cooking!