Let’s get real. I’ve got a confession that might shock you: I absolutely detested macarons when I first encountered them. Picture me, 10 years old, at a fancy bakery with my mother. I’m eyeing these tiny, colorful mounds of almond flour and frosting, and all I could think was, “Where’s the chocolate chip cookie?” Honestly, why do people get so hyped over these delicate, air-filled confections that looked like they’d float away if a gentle breeze blew? Spoiler alert: I was missing out. Fast forward to today, and I’m obsessed. That’s right—these sugary treats have won my heart, my kitchen, and might just be the perfect way to impress your friends or trick them into thinking you’re a pastry chef (when clearly, we know you’re just a home cook with a Pinterest addiction).
Why did I change my tune, you ask? Let me paint a picture: a rainy Sunday afternoon, a bored me, and an Instagram feed filled with flawless vanilla macarons. I was enchanted. I decided I was going to conquer my childhood disdain and whip up a batch. After a few rounds of trial and error (I still curse the day I ever met that recipe calling for “a pinch of salt” that turned out to be an entire teaspoon — thanks, but no thanks), I can now proudly say I’ve mastered these little morsels of joy. So grab your mixing bowl and let’s dive into the wacky world of homemade vanilla macarons!
Ingredients, Unfiltered
What’s Really in Vanilla Macarons
Let’s break down the lineup for our fabulous vanilla macarons. And trust me—this is going to be as fun as gathering your besties for girls’ night!
Almond Flour: The superstar of this show! Make sure to get finely ground almond flour. Don’t roll your eyes at me, but using anything else is an instant macaron fail. Seriously, if you grab that coarse stuff, you might as well toss your hopes and dreams in the trash! Brands like Bob’s Red Mill are reliable if you’re unsure where to start.
Powdered Sugar: Some people also call it icing sugar or confectioner’s sugar. Just know it’s what gives our macarons that sweet goodness. I may or may not have tasted a little while mixing this in—don’t judge me!
Egg Whites: Ah yes, the *heart* of any good macaron. They need to be at room temperature if you want that perfect volume and stability. I usually leave these bad boys out for at least an hour before I crack ‘em, but here’s a little life hack: if you’re in a rush, pop them in warm water for about 10 minutes. Just don’t boil them. We are making cookies, not breakfast scrambled eggs.
Granulated Sugar: Just a little bit to help stabilize those egg whites. Pro tip: It also gives the shells that nice, shiny look we all love. Use a good-quality sugar—don’t be stingy now!
Vanilla Extract: Because we’re making vanilla macarons, right? Honestly, go for the real stuff. Skip the imitation extract; it just doesn’t cut it. Nielsen-Massey? Yes, please.
Butter: Oh, we’re not doing the buttercream frosting smear here. We’re making an amazing filling. Salted or unsalted? Your call, but if you go for salted, I’ll let you take the blame when it overshoots the flavor chart.
Heavy Cream: To whip into that decadent, creamy filling. It’s not just for whipping your coffee; this magic elixir brings balance to the filling, ensuring it doesn’t knock your tastebuds out like a boxing match.
Let’s Talk Health (or Not)
Is This Even Healthy? Let’s Discuss
Let’s get real about health for a second. Sure, there’s sugar, butter, and those lovely little eggs; but here’s the deal—I’m not making macarons for their health benefits. No one’s claiming these are kale shakes, people!
Yes, there’s almond flour, which, bonus, is gluten-free. And yes, some might say almonds are healthy fats blah, blah, blah. But let’s not kid ourselves: indulging in these little beauties is not about convincing ourselves it’s a health food. Honestly, if you want a salad, go make a salad. For my part, I embrace life’s little pleasures, and these treats are at the top of my list! So are we living the healthy lifestyle here? Nah, but that’s totally not the point.
Your Grocery List
Here’s What You’ll Need
Before we get cooking, here’s an easy-to-digest list of our ingredients. Make sure to double-check your pantry because whoever runs out of powdered sugar mid-bake has officially made a cooking faux pas!
– 1 cup (140g) finely ground almond flour
– 1 ¾ cups (220g) powdered sugar
– 3 large egg whites (about 100g), at room temperature
– ¼ cup (50g) granulated sugar
– 1 teaspoon vanilla extract (or more if you’re feeling adventurous)
– ½ cup (113g) unsalted butter, at room temperature
– 1 cup (240ml) heavy cream
– Optional food coloring (if you’re feeling extra fancy, add a touch)
Most of these should serve about 12 people, assuming you want to share. If you’re anything like me, you’ll make a batch and finish it off before anyone else sees it!
The Actual Cooking Part
Okay, Let’s Make This
Alright, my fellow kitchen warriors, put on your apron, and let’s transform these humble ingredients into something scrumptiously extravagant! Here comes the best part: I’m going to guide you through it all. Deep breath, here we go!
1. **Sift the dry ingredients:** Begin by whisking together the almond flour and powdered sugar in a medium bowl. This is crucial; it helps prevent the dreaded lumps and ensures your macarons will have that perfect smooth surface. Om noms!
2. **Whip those egg whites:** In a clean bowl (no greasiness, please!), start whisking those egg whites using a handheld mixer or a stand mixer if you want to flex your culinary muscles. Whip them until they’re frothy and then slowly add in the granulated sugar. Keep whisking until you reach *stiff peaks*. Yep, that means when you lift the beaters, the whites stand upright without drooping. If you’ve ever held an awkwardly high ponytail, you know the struggle!
3. **Mix in the vanilla:** Add the vanilla extract (I always go heavy on this part) and continue whisking until combined. It smells heavenly in here, doesn’t it?
4. **Combine it all:** Next, fold the dry ingredients into the whipped egg whites. Use a rubber spatula and be gentle; we don’t want to deflate our beautiful meringue! This is the secret alchemy moment where the magic happens, my friends.
5. **Pipe those beauties:** Transfer the batter into a piping bag fitted with a round nozzle. Now here’s where it might get a tad messy. Pipe small rounds (around 1.5 inches in diameter) onto a baking sheet lined with parchment paper. Don’t panic if they look messy—let’s call it an artistic touch. If you find your macarons are more like blobs than circles, you might need to work on your piping game. Don’t panic; you’ll get the hang of it.
6. **Rest those cookies:** This part is pretty essential. Let the piped macarons sit at room temperature for about 30-60 minutes until they develop a *skin*—you know, that shiny exterior that makes them look all fancy and Instagram-worthy.
7. **Preheat and bake:** While they’re resting, preheat your oven to 280°F (140°C). Bake them in batches for about 15-18 minutes, rotating the trays halfway through. You want those little wonders to rise and form those iconic feet!
8. **Cool down:** This step is super important. Once your macarons are aromatic and gorgeous, take them out and let them cool completely before you remove them. Patience, my friends; burning your fingers on a hot macaron is no fun!
9. **Make the filling:** In the meantime, whip the butter until it’s soft and fluffy (about 2 minutes). Gradually add in the powdered sugar (and try not to make a snowstorm—trust me on this), and then pour in that heavy cream. Whip till it reaches a smooth consistency and tastes downright heavenly. A pinch of vanilla for good measure? Oh, you betcha!
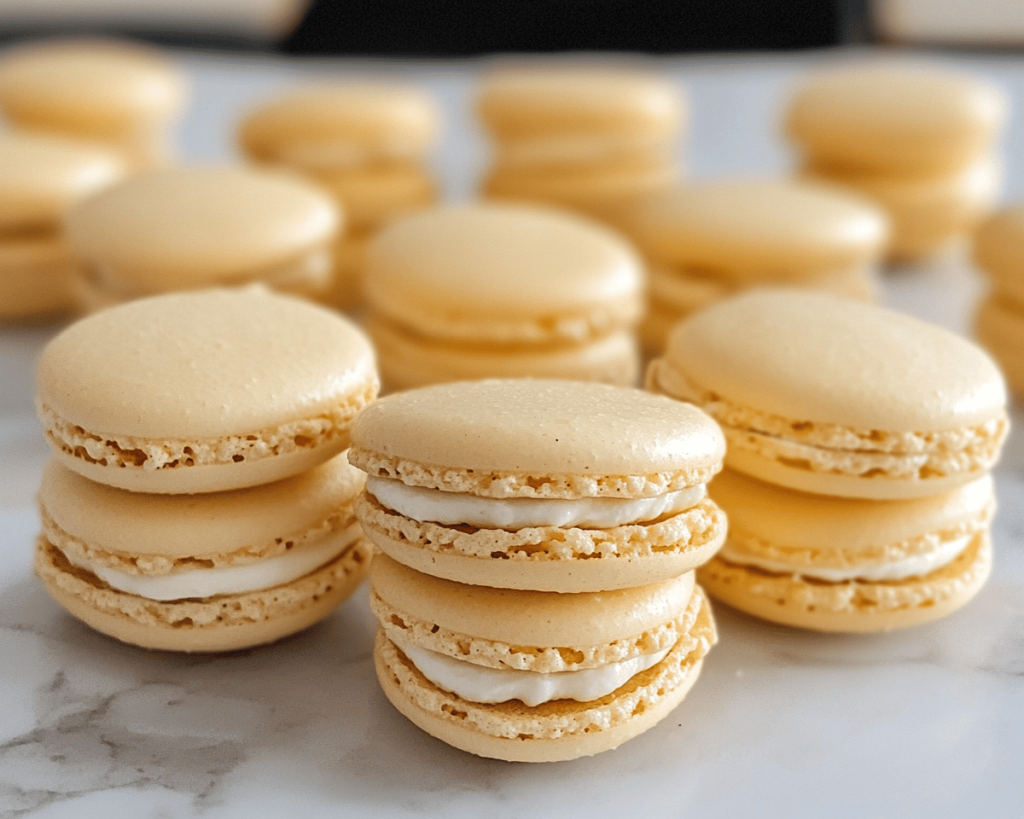
10. **Assemble the macarons:** Once your shells are cool, spread or pipe the heavenly filling onto the flat side of one shell, and gently sandwich it with another. Take a moment to admire your cute little creations before you dive into them. You’re basically royalty at this point.
Side Notes & Sassy Hacks
Bonus Tips You Didn’t Ask For
I’ve had my fair share of chaotic cooking moments when it comes to macarons, so here are some helpful tips to ensure your experience is as flawless as possible:
– **Don’t panic if your macarons spread:** If your macaron batter is too runny, you may have over-folded. If they look more like pancake blobs than dainty shells, don’t worry—keep it for practice; everyone has an off day!
– **Joy of food coloring:** If you want to be that aesthetically pleasing baker, add a couple of drops of gel food coloring! We’re all here to impress our friends and relatives, aren’t we?
– **Clean your mixing bowl:** Really! Make sure there are no traces of grease in your mixing bowls; it can mess with your egg whites and ruin your macaron dreams!
– **Don’t skip the *resting* phase:** Seriously, it’s a must if you want a smooth, shiny surface.
– **Store them with care:** If you manage to save some for later (hats off to you!), let them cool completely before storing them in an airtight container. They can last in the fridge for about a week—but let’s be honest—who can wait that long?
Final Words of (Culinary) Wisdom
Honestly, you might find that the first batch of macarons doesn’t come out perfect, and that’s totally okay. You might forget to add the sugar or panic—with self-talk that is way too relatable—and have macarons that give you more of a sad *bloop* than a triumphant *pop* when you bite through them. But remember, every great cook started somewhere, and the fact that you’re even attempting these beauties is worth celebrating!
So roll up those sleeves, embrace the mess, and get ready to show off your dazzling new talent. If you try out this vanilla macaron recipe, tag me on social media. Or just send me a mental high-five; I’ll take it! Happy baking, friends! Enjoy every scrumptious bite!