Prep time: 15 minutes
Cook time: 25 minutes
Total time: 40 minutes
Servings: 12 servings
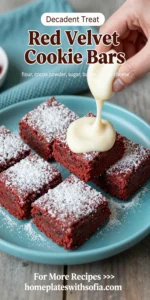
Red Velvet Cookie Bars are a delightful treat that beautifully combine the classic flavors of red velvet cake with the convenience of bar cookies. These bars have a rich, buttery flavor with a subtle cocoa background, complemented by a creamy frosting that creates an indulgent experience. The deep red color not only makes them visually striking but also adds a festive element, making them perfect for various celebrations, from birthdays to holiday gatherings. If you’ve never tried making cookie bars before, let this recipe introduce you to a sweet, easy-to-make dessert that will quickly become a crowd-pleaser.
What Is Red Velvet Cookie Bars?
Red Velvet Cookie Bars are essentially a cross between red velvet cake and classic cookie bars. They feature the signature red hue along with a delightfully soft and chewy texture. The addition of butter and white chocolate chips enhances the richness, while a sprinkle of cocoa powder gives just the right amount of chocolate flavor. Topped with a tangy cream cheese frosting, these bars offer a unique take on a beloved dessert classic.
Why You’ll Love This
You’ll love this recipe for its simplicity and the joy it brings to both the baker and the lucky guests. It’s a great way to indulge without the fuss of layer cakes. Whether baking for a family gathering, a school potluck, or just for a weekend treat at home, these cookie bars are an easy yet impressive dessert. The balance of sweetness from the frosting and the slight tang from the cream cheese will have everyone asking for seconds. Plus, cleanup is a breeze, leaving you more time to enjoy your creation.
Ingredients You’ll Need
- 2 1/2 cups all-purpose flour: This is the base of your cookie bars, providing the necessary structure.
- 1/4 cup cocoa powder: Just enough to give the bars a subtle chocolate flavor without overpowering the red velvet essence.
- 1 teaspoon baking soda: This helps the bars rise and gives them a light texture.
- 1/2 teaspoon salt: Enhances the flavor of the bars.
- 1 cup unsalted butter, softened: Adds richness and ensures a chewy texture.
- 1 1/2 cups granulated sugar: Sweetness is key, and this will also contribute to the moistness of the bars.
- 1 cup brown sugar: The added molasses gives depth of flavor and moisture.
- 2 large eggs: Provide structure and act as a binding agent.
- 1 tablespoon vanilla extract: A must-have for that aromatic quality.
- 1 tablespoon red food coloring: The star ingredient that gives these bars their iconic hue.
- 1 cup white chocolate chips: For added sweetness and texture.
- 8 oz cream cheese, softened: The base for the frosting that adds a tangy flavor.
- 4 cups powdered sugar: Sweetens the frosting to balance the cream cheese.
- 1 tablespoon milk: To achieve the desired consistency for the frosting.

How to Make
- Preheat your oven to 350°F (175°C). Grease and line a 9×13-inch baking pan with parchment paper, leaving some overhang on the edges for easy removal. This step ensures that your cookie bars come out of the pan easily and retain their shape.
- In a medium bowl, whisk together the flour, cocoa powder, baking soda, and salt. This mixture combines all the dry ingredients evenly and is crucial for achieving the right texture in your bars.
- In a large bowl, cream the butter, granulated sugar, and brown sugar until light and fluffy. This usually takes about 3-5 minutes. Proper creaming incorporates air into the mixture, resulting in a tender, light bar.
- Beat in the eggs, one at a time, followed by the vanilla extract and red food coloring. Make sure to scrape down the sides of the bowl to ensure everything is well combined. The batter should become a vibrant red, further enhancing the cookie bars’ visual appeal.
- Gradually add the dry ingredient mixture to the wet ingredients, mixing until just combined. Be careful not to overmix, as this can lead to tough cookies. Fold in the white chocolate chips gently to evenly distribute them throughout the batter.
- Pour the batter into the prepared baking pan and spread it evenly using a spatula. You want to make sure it levels out to ensure even baking. Bake for about 25-28 minutes or until a toothpick inserted into the center comes out clean. Allow to cool in the pan for a few minutes before transferring it to a wire rack to cool completely.
- While the cookie bars are cooling, prepare the cream cheese frosting. In a medium bowl, beat the cream cheese until smooth and creamy. Gradually add the powdered sugar and mix well. Add the milk to reach your desired consistency.
- Once the cookie bars are completely cool, spread the cream cheese frosting evenly over the top using a spatula. For added flair, sprinkle some extra white chocolate chips on top if desired. Cut into squares and serve!
Variations & Substitutions
Nut-Free Version: If you want to make this recipe nut-free, ensure that all your ingredients, particularly the chocolate chips, are from a nut-free facility. You can even replace the white chocolate chips with an allergy-friendly alternative.
Red Velvet Brownies: For a more fudgy texture, you can use the same recipe but swap half of the all-purpose flour with cocoa powder. This will yield a denser brownie-like bar that pairs exceptionally well with the creamy frosting.
Cheesecake Swirl: Blend together some extra cream cheese and sugar, then swirl it into the batter before baking. This adds a delightful cheesecake layer to your cookie bars, elevating the dessert to a new level of indulgence.
Gluten-Free Version: Substitute the all-purpose flour with a 1:1 gluten-free all-purpose flour mix. Just make sure it contains xanthan gum, as this helps maintain the right texture.
Colored Frosting: Instead of the usual white cream cheese frosting, consider using colored frosting to match any theme or occasion — it takes these cookie bars to a whole new level visually!
Common Mistakes to Avoid
One common issue is overmixing the batter, which can lead to dense and tough cookie bars. To avoid this, mix until the ingredients are just combined.
Another mistake is not letting the bars cool completely before frosting. Frosting warm bars will result in a gooey mess rather than a beautifully frosted treat.
Finally, make sure you’re measuring your ingredients accurately, especially the flour. Fluff up the flour and spoon it into your measuring cup rather than scooping directly from the container to avoid packing it down.
Storage, Freezing & Reheating Tips
To store your Red Velvet Cookie Bars, wrap them tightly in plastic wrap or place them in an airtight container. They will last for up to five days at room temperature. For longer storage, these bars can be frozen. Just slice them into squares, wrap them individually in plastic wrap, and place them in a freezer-safe bag. They can be frozen for up to three months.
When you’re ready to enjoy them, thaw at room temperature for a few hours. If you prefer them warm, pop them in a preheated oven at 350°F (175°C) for about 10-15 minutes.
For food safety, never leave the bars out at room temperature for more than 2 hours, especially in warmer conditions.
Frequently Asked Questions
Can I use another type of food coloring?
Yes, you can substitute red food coloring with other liquid or gel food colorings to achieve different colors. Just be cautious with the amounts, as various brands have different pigmentation levels.
How can I tell when the cookie bars are done baking?
You can check for doneness by inserting a toothpick into the center of the bars. If it comes out clean or with a few moist crumbs, your bars are ready. They might still look a bit soft in the middle, but they will continue to set as they cool.
Can I make these cookie bars ahead of time?
Absolutely! You can make and frost them a day in advance. Just store them in an airtight container in the refrigerator until you’re ready to serve.
What’s the best way to cut these bars?
To achieve clean cuts, use a sharp knife, and wipe it clean between cuts. You can also chill the bars for an hour before cutting, which makes slicing even easier.
Can I add nuts or other mix-ins?
Definitely! Feel free to add some chopped nuts, chocolate chunks, or even sprinkles for an additional texture and flavor burst. Just keep in mind that adding too many mix-ins may alter the baking time slightly.
Conclusion: Red Velvet Cookie Bars are the perfect blend of taste and convenience, allowing you to enjoy a classic dessert in an easy-to-make format. Their rich flavor profile, combined with the festive red color and creamy frosting, makes them ideal for any occasion. Whether you’re baking for a holiday celebration, a birthday party, or simply to satisfy your sweet tooth, these cookie bars won’t disappoint. Give them a try, and celebrate the comforting joy of baking!